Single Sign On
Displayr supports Single Sign On to allow users to log in without needing another password. When Single Sign On is enabled then your company's password system decides who can use Displayr, and which dashboards they can see. Please note this feature is only available Displayr Enterprise customers. Please contact us at support@displayr.com for enquiries.
Prerequisites
- Your company has a subdomain. e.g. mycompany.displayr.com. If you don't have one, please contact Displayr support.
- You are a Displayr administrator. (You are in the Administrators group in Displayr.)
- Your company's password system ("Identity Provider") supports SAML2.0 SP initiated Web Browser Single Sign-On (also known as the "SP Redirect Request; IdP POST Response" profile). You will need help from an administrator of that system.
Special instructions
Microsoft Azure Active Directory
If you are using Microsoft Azure Active Directory, see https://docs.microsoft.com/en-gb/azure/active-directory/saas-apps/displayr-tutorial for detailed instructions.
Setup for your password system ("Identity Provider", "IdP")
In order to set up your Identity Provider you will need some information about the Service Provider (Displayr).
- Ensure you have a subdomain set up for you, e.g. mycompany.displayr.com. If not please contact Displayr support to have this set up for you before you continue these steps.
- In Displayr: click on the profile icon at the top right and then select Account settings from the dropdown.
- On the Account Settings page select the Settings tab.
- Scroll down and click on Configure Single Sign On (SAML).
- The information needed to configure the identity provider is under the Service Provider Information heading on this page.
- If your identity provider takes an SP metadata XML file a preconfigured one for your company can be downloaded by clicking Download Metadata xml file on this page.
Setup in Displayr ("Service Provider", "SP")
- In Displayr: click on the profile icon at the top right and then select Account settings from the dropdown.
- On the Account Settings page select the Settings tab.
- Scroll down and click on Configure Single Sign On (SAML).
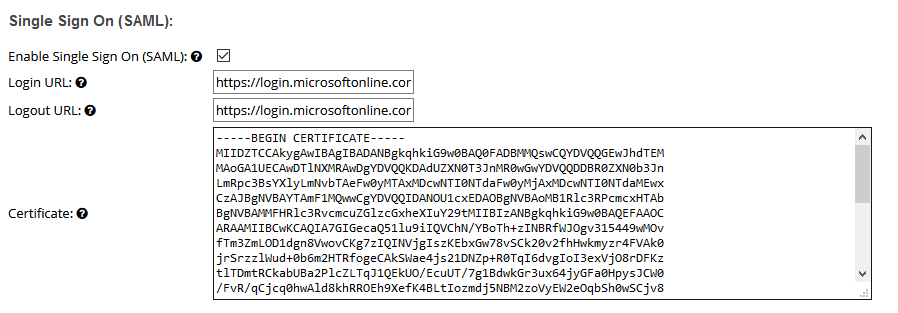
- Under the heading Single Sign On (SAML) you will need to fill in some information from your Identity Provider:
- You can hover over the ?'s to get more information about each option.
- The key options that must be filed in are Login URL and Certificate.
- After all configuration has been done Tick Enable Single Sign On (SAML) and click Save.
Here is an example of what the settings might look like once completed:

Groups
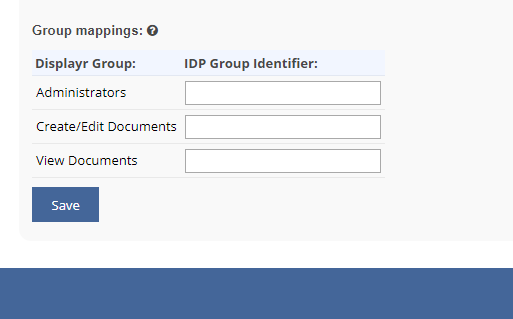
Users will be assigned to groups in Displayr based on the groups that they were given on your company's password system. Displayr groups control which dashboards each user can see. Your company's password system administrator must supply the codes for each security group that should be matched to Displayr. Any groups that are left blank here will be ignored by Single Sign On, and must be managed manually in Displayr.
- Displayr extract the list of groups from the saml:Attribute with the name: http://schemas.microsoft.com/ws/2008/06/identity/claims/groups.

Mixed types of users
Displayr allows a mixture of manually-configured users (identified with e-mail addresses and passwords, as normal), and users who come in via Single Sign On.
- Single Sign On users will only appear in the Displayr Users list after successfully logging in.
- If you also have non-SSO logins, you can log in to those using either app.displayr.com or mycompany.displayr.com/Login/Direct
- Either type of user can be manually put in any Displayr group. Further, Single Sign On users will be automatically added to or removed from groups each time they log in, according to your company's password system.
User id attributes checked
- Displayr extracts the user's id, in this priority order (case sensitive):
- saml:Attribute with the name: User.email
- saml:Attribute with the name: emailaddress
- saml:Attribute with the name: mail
- saml:Attribute with the name: http://schemas.xmlsoap.org/ws/2005/05/identity/claims/User.email
- saml:Attribute with the name: http://schemas.xmlsoap.org/ws/2005/05/identity/claims/emailaddress
- saml:Attribute with the name: http://schemas.xmlsoap.org/ws/2005/05/identity/claims/mail
- saml:NameID within the saml:Subject